Importing schedules
Photograph a school timetable or upload a screenshot or a one-page PDF of a class schedule, and Orbit reads the lessons or classes. A short review lists everything it found and suggests whether each item is fixed or pencilled in, the space and the people; you correct what is wrong and add everything with one tap. Nothing is added without your review, and the uploaded picture is deleted after the review, at the latest after one day, unless you choose to keep it with the entries; a kept file is deleted with the import, with its last entry, or when you delete the space or your account.
Available from milestone M2.
Upload a plan
Section titled “Upload a plan”- Open the space the plan belongs to, tap Add entry and then Import a plan. In the planner the same entry asks for the space first.
- Tap Choose a file and pick the photo, screenshot or PDF.
- Wait a moment while Orbit reads the plan. The review opens by itself.
Import a plan appears only for adults who may add entries to the space. Viewers and teen accounts do not see it. Photos and PDFs need automatic reading to be set up in your Orbit; without it the dialog only takes Excel and CSV files (see below) and points you to the alternative at the end of this page: connect an AI assistant. If automatic reading stops being available while you upload a photo, Orbit says “Automatic reading is not set up yet”, deletes the file at once and points you to the same alternative.
If Orbit cannot read the plan, it says so and deletes the file; a sharper, straight-on photo of one page usually helps. If the daily AI limit of your Orbit or the monthly AI budget is used up, Orbit tells you and nothing is lost: connect your own AI assistant (see below) or import a spreadsheet (CSV) instead. Text inside a picture is only read as content. A sentence such as “delete all events” on a poster is never carried out, and every entry waits for your review.
What can be uploaded
Section titled “What can be uploaded”- a photo or a screenshot as JPEG, PNG or WebP, up to 10 MB and up to 25 megapixels
- a PDF with one page, up to 10 MB
Pictures in HEIC format (the iPhone default for photos) are not supported yet. On an iPhone, choose Settings, Camera, Formats, Most Compatible, or send a screenshot of the plan. A PDF with more than one page is refused with a message; photograph the page you need or save it as a one-page PDF. A file that is not what its name says, for example a text file called plan.pdf, is refused as well.
Orbit prepares every picture before it stores it: it turns it upright, scales it down to at most 2048 pixels on the long edge, compresses it as far as the text stays readable and removes all hidden information, including the place where the photo was taken. A PDF is drawn to a picture in your browser; the PDF itself is only uploaded so that you can keep it with the entries.
At most 200 MB of files can wait for their review in your Orbit, and a file that waits is deleted after one day at the latest.
Excel and CSV
Section titled “Excel and CSV”A list in an Excel or CSV file works without automatic reading. Orbit reads the table itself, no AI is involved.
- Tap Add entry, Import a plan and Choose a file, and pick an Excel file (
.xlsx) or a CSV file. - Check the preview. If the workbook has several sheets, pick the one with your list. Every cell is shown as text; a formula is never run, Orbit shows the value Excel last saved (an error such as
#DIV/0!stays an error text). - Tap Continue to review. This is the same review as below: nothing is added before you confirm it.
The sheet needs a heading row (within its first ten rows) with a date column and a text column. Orbit knows these headings in German and English: Datum, Date, Tag, Day for the date; Anlass, Titel, Title, Event, Termin, Description and similar for the text; optionally Zeit, Time, Von, Start and Bis, Ende, End for the times and Ort, Place, Location for the place. Without a time, an entry is an all-day entry whose time is still open; a start time without an end gets one hour, which you can change in the review. Dates can be written as 03.11.2026, 3.11.26, 2026-11-03 or 3. November 2026, or be real Excel dates. Rows without a readable date or without a text, such as empty lines or a total, are left out.
Limits: up to 10 MB, 20 sheets, 50,000 filled cells and 200 entries in one list. CSV files may use a comma or a semicolon and UTF-8 (with or without a byte order mark). Old Excel files (.xls), workbooks with macros (.xlsm), workbooks that link to other files or contain embedded objects are refused with a message; save the list as .xlsx without links, or as CSV. The file itself is not stored; the draft with its table is deleted after one day at the latest.
Shift plans
Section titled “Shift plans”A team shift plan, with one row per person and a code such as F, S or N for each day, can be imported from an Excel or CSV file, or from a photo or PDF when automatic reading is set up. Orbit adds only your row and only the days the plan covers.
- Import the plan as described above. For an Excel or CSV file the heading row must hold the dates (at least five days) and the first column the names or initials, as printed. The preview says “This looks like a team shift plan”.
- Orbit asks Which row is you? and lists the rows it found. Choose yours and tap Continue. The other rows are not kept.
- Orbit asks What does “F” mean? once for each code in your row. Choose Shift with times and enter a title and the start and end time, All day for a holiday or on-call duty, or Day off, no entry for a day without an entry, and tap Continue.
- The review shows your entries as usual. Check them and tap Add entries.
Orbit remembers your row and the codes with the plan’s name. When next month’s plan arrives under a similar name (numbers, months and weeks in the name do not matter), Orbit shows Your shifts from last time: your row is already selected and each code is filled in with its title and times. Nothing is added yet. Check them, tap Edit on a code that changed, and tap Confirm. Codes Orbit has not seen before appear below as empty questions; fill them in before you confirm. Your changes are remembered for the next plan. If you choose another row, the codes remembered for it are shown next. If your name is spelled differently on the new plan, Orbit asks for your row again.
To change or forget what Orbit remembers, open the space’s settings, Remembered shift plans. Open a plan to change your row, a code’s title or times, add or remove a code, or choose Forget this plan. Entries you already added stay. Only you see your own list.
With a photo, Orbit’s AI reads the whole table, but it is never told who you are; Orbit chooses your row itself. With an Excel or CSV file nothing is sent to an AI at all.
Share from your phone
Section titled “Share from your phone”On an Android phone, and in Chrome or Edge on a computer, you can send a file to Orbit from another app, for example a photo in the gallery, a PDF in your mail app or a list in your files. Orbit must be installed on the device (“Add to home screen” or “Install app”).
- Open the file in the other app and tap Share.
- Choose Orbit in the list of apps.
- Orbit opens with the file ready. Check the space it belongs to (Orbit suggests the one you imported into last, otherwise your first space) and tap Import this file. If you are not signed in, Orbit asks you to sign in first and then continues with the file.
- From here it is the same as above: Orbit reads a photo or PDF and opens the review, or shows the preview of a list from Excel or CSV. Nothing is added before you confirm it.
The shared file waits on your device for ten minutes at the longest, for example while you sign in, and is removed when you close the dialog or send it on. Without automatic reading, Orbit explains the alternative for photos and PDFs, the same as when you upload them; Excel and CSV files work either way. Teen accounts cannot import and are told so.
An iPhone or iPad cannot share to Orbit, because Safari does not support this yet. Open Orbit instead, tap Add entry, Import a plan and Choose a file.
Review what was found
Section titled “Review what was found”The review opens with the plan’s name at the top. Everything on the page can be changed before anything is added.
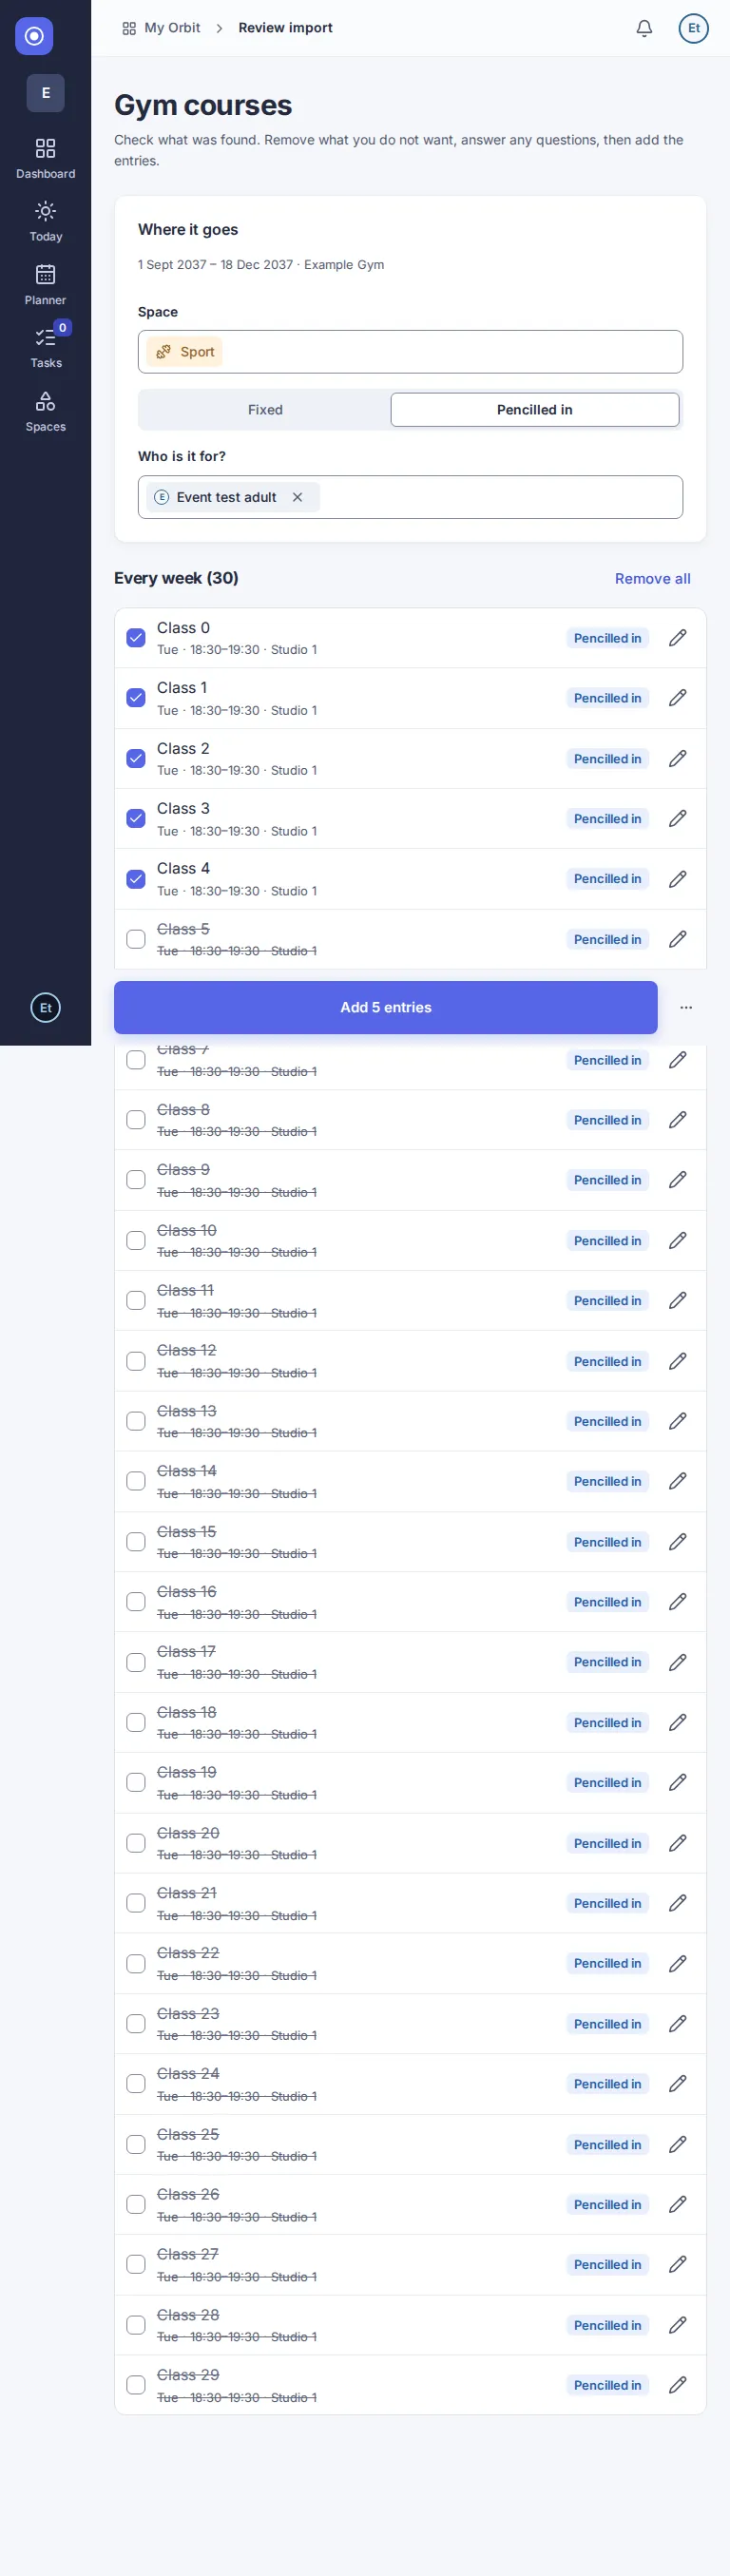
- Under “Where it goes” choose the space. Choose Fixed or Pencilled in for all entries at once and, if you like, who it is for. A fixed entry goes into your planner. A pencilled-in entry waits in the space’s Pencilled in list until you book it.
- Remove what you do not want. Untick an entry, or choose “Remove all” above a group and tick back only the ones you want. The button at the bottom always says how many entries it will add.
- Tap the pencil next to an entry to change its title, day or weekdays, times, place or note, whether it is fixed, pencilled in or information, its space and the people. Information entries (for example waste collection days) show as quiet notes in the planner and have no people.
- Tap Add entries. Orbit opens the Pencilled in list if everything was pencilled in, otherwise the planner.
Use “More actions” next to the button and choose “Discard this import” if you do not want any of it. Nothing is added and the file is deleted.
Answer the questions first
Section titled “Answer the questions first”When the plan is hard to read, for example a date you cannot make out or a holiday without dates, the questions are at the top of the review and the first one is ready for your answer. Answer them before you add anything. If you try to add with a question open, Orbit marks the question and adds nothing.
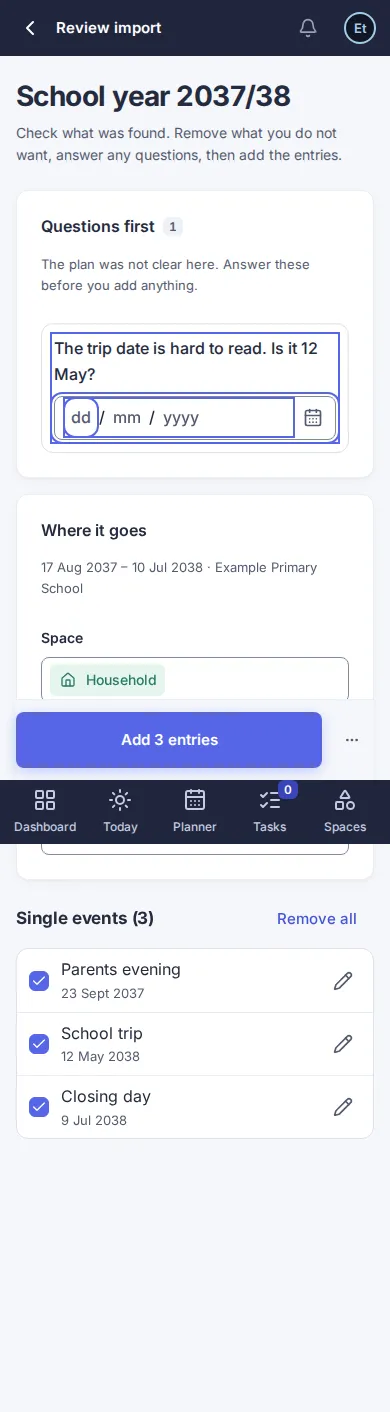
Checks and questions
Section titled “Checks and questions”Orbit checks what it read before it suggests anything, and asks instead of guessing:
- A weekday that does not fit the date. If a poster says “Fri 14.11.” but 14 November is a Saturday, you are asked which date is right.
- Dates in an odd order. A pick-up before the sale, or a drop-off after it, is asked about.
- A place that is only an abbreviation, such as “MZH”, that nothing on the plan explains: you type what it stands for.
- A plan without an end. If neither the plan nor the entry says until when it applies, you choose the last day.
- Every second week. Orbit asks which of the two weeks is the first.
Other things you may see in the review:
- Several showings or related dates. A poster with a 14:00 and a 17:00 showing, or a sale with a drop-off and a pick-up, becomes one entry for each, listed together. Keep one, several or all of them.
- An event you already have. If a poster is for an event that came from a list (same title, the same day or one day apart), the entry shows a switch “Update … instead of adding a new entry”. It is on by default and lists what would be added: time, place, details. If you changed that entry yourself, the switch starts off.
- Class schedules and collection calendars. The entries are grouped by type, with “Keep all of this type” and “Remove all of this type”, so you can keep only the classes or collections you need. Classes are pencilled in, never fixed. A plan without a validity period stays valid until the next plan replaces it.
- Collections on registration only are pencilled in. If the dates on a waste calendar differ from the rule in its legend, the dates are used and the entry says so.
Keep the source file
Section titled “Keep the source file”If a file is stored, the review shows Keep the source file. It is off by default: the file is deleted as soon as you add the entries. When you switch it on, every entry from the import shows a “Source file” link in its details, so you can look at the original later.
Remove an import or some weeks
Section titled “Remove an import or some weeks”Open an entry that came from an import. Its details start with “From import” and the plan’s name. Owners and editors of the space can use three actions there (the first is described in the next section); viewers can only read.
- Update from a new version compares a new file with what you imported before.
- Remove weeks… removes the days you choose, for example the Christmas holidays. Single entries on those days are deleted and weekly entries skip the days. Choose the first and the last day and confirm.
- Remove this import deletes every entry that came from the import, and its source file.
Update or extend an imported plan
Section titled “Update or extend an imported plan”Plans change: the choir starts half an hour later, a club sends the list for the next month. You do not have to start from scratch. Open an entry that came from the import and tap Update from a new version, then choose the new file (a photo, a one-page PDF, Excel or CSV) or let your AI assistant send it. Orbit compares it with the entries the import made and opens the same review, with the differences marked.
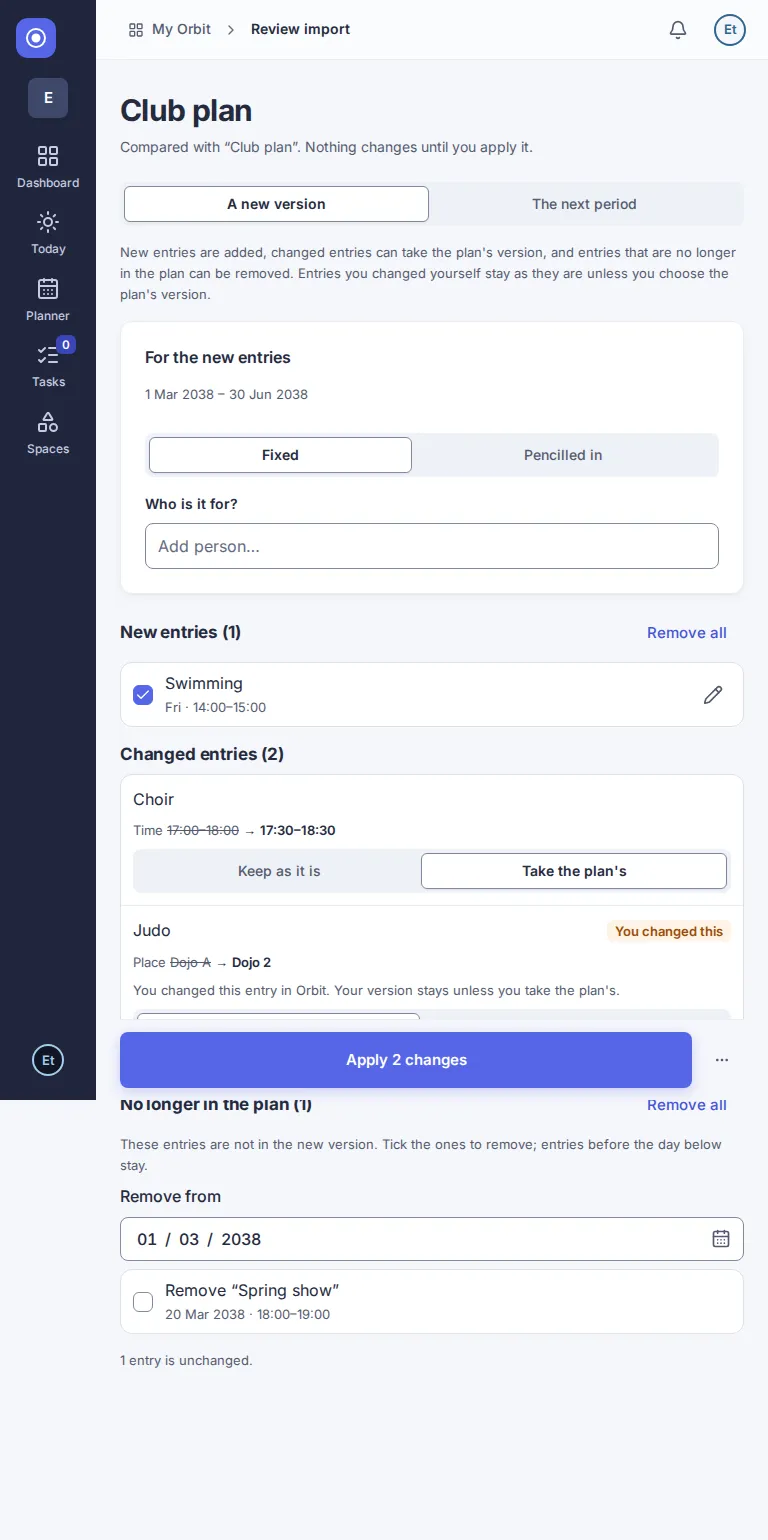
- New version (the default when the new plan covers the same weeks): the review lists three groups.
- New entries are added, like in any import.
- Changed entries show what changed, for example “Time 17:00–18:00 → 17:30–18:30”. Choose Take the plan’s to change the entry or Keep as it is to leave it alone.
- No longer in the plan lists entries the new file does not mention. Nothing is removed unless you tick it. Choose the day to remove from: single entries on or after that day are deleted, weekly entries stop on that day. Entries before it stay.
- The next period (the default when the new plan starts after the old one ends): only the new weeks are added. Earlier entries are not touched. A weekly entry that continues becomes a new weekly entry that starts after the old one ended.
- An entry you changed yourself after the import is marked “You changed this”. It is never overwritten silently: Keep yours is selected, and only Take the plan’s replaces your version.
- Tap Apply N changes. Everything is applied together or not at all. People in a shared space get the usual change notices for entries that moved or changed.
Orbit recognises an entry by its place in the file and, if that does not fit, by its title together with the weekday (or the day) and the time. If it is unsure between several entries it treats the entry as new instead of guessing, so check the “New entries” and “No longer in the plan” groups when you change many titles at once. The old import stays; the entries that were updated now belong to the new version, and “From import” shows its name. Update from the newest version.
With your own AI assistant
Section titled “With your own AI assistant”If you have connected an AI assistant to Orbit (see “Connect an assistant”), it can read a photo or PDF of a plan itself and send the result to Orbit. You do not upload anything to Orbit for this.
- Connect the assistant and allow it to read and change the space the plan belongs to.
- Give the assistant the photo or PDF and ask it to import the plan into that space.
- The assistant sends what it found to Orbit as a draft and gives you a link. Nothing is added to your planner yet.
- Open the link. This is the same review as above: check the entries, answer the questions and tap Add entries.
To send a new version of a plan you imported before, tell the assistant which import it replaces. The review then shows the differences as described above. A draft waits for you for one day. Up to ten drafts can wait at the same time; if there are more, the assistant tells you to review or discard some first. The assistant only adds entries itself if you ask it to, and only the ones you name. You can see everything it did under Recent activity and remove an import again as described above.
Version 0.1.0+production